Cascading cards
Our Split screen intro section and navigation are ready and we can move on to the next step. This time we will create the "My projects" section and add special, cascading cards to it.
Step 1 - add an empty "My projects" section
Inside the <main> section add a
.container class with auto margins and padding. Then inside the
.container add an empty "My projects" section with a heading.
Also remove the hard-set .h-[500px] height in
<main>, as we only used it for testing:
    <!--Main layout-->
    <main>
      <div class="container mx-auto lg:px-32">
        <!-- Section: My projects -->
        <section class="mb-28 text-center">
          <h2 class="mb-12 text-center text-3xl font-bold">My projects</h2>
        </section>
        <!-- Section: My projects -->
      </div>
    </main>
    <!--Main layout-->
By the way, you will notice that the heading of the
"My projects" section is too close to our intro above.
Let's add a large bottom margin to the <header> section
to make some space between them.
<header class="mb-28">[...]</header>
Step 2 - add grid with 3 columns
Add a grid with 3 columns (for large screens) inside. Nothing new to explain, we've done this many times before:
    <!-- Section: My projects -->
    <section class="mb-28 text-center">
      <h2 class="mb-12 text-center text-3xl font-bold">My projects</h2>

      <!-- Grid -->
      <div class="grid grid-cols-1 gap-8 lg:grid-cols-3 xl:gap-12">
        <!-- First column -->
        <div></div>
        <!-- First column -->

        <!-- Second column -->
        <div></div>
        <!-- Second column -->

        <!-- Third column -->
        <div></div>
        <!-- Third column -->
      </div>
      <!-- Grid -->
    </section>
    <!-- Section: My projects -->
Step 3 - add a card to each column
From the cards documentation page, copy the Image with ripple sample code and insert it into each column.
    <!-- Grid -->
    <div class="grid grid-cols-1 gap-8 lg:grid-cols-3 xl:gap-12">
      <!-- First column -->
      <div>
        <!-- Card -->
        <div
          class="block rounded-lg bg-white shadow-[0_2px_15px_-3px_rgba(0,0,0,0.07),0_10px_20px_-2px_rgba(0,0,0,0.04)] dark:bg-neutral-700">
          <div
            class="relative overflow-hidden bg-cover bg-no-repeat"
            data-twe-ripple-init
            data-twe-ripple-color="light">
            <img
              class="rounded-t-lg"
              src="https://tecdn.b-cdn.net/img/new/standard/nature/186.jpg"
              alt="" />
            <a href="#!">
              <div
                class="absolute bottom-0 left-0 right-0 top-0 h-full w-full overflow-hidden bg-[hsla(0,0%,98%,0.15)] bg-fixed opacity-0 transition duration-300 ease-in-out hover:opacity-100"></div>
            </a>
          </div>
          <div class="p-6">
            <h5
              class="mb-2 text-xl font-medium leading-tight text-neutral-800 dark:text-neutral-50">
              Card title
            </h5>
            <p class="mb-4 text-base text-neutral-600 dark:text-neutral-200">
              Some quick example text to build on the card title and make up the
              bulk of the card's content.
            </p>
            <button
              type="button"
              class="inline-block rounded bg-primary px-6 pb-2 pt-2.5 text-xs font-medium uppercase leading-normal text-white shadow-primary-3 transition duration-150 ease-in-out hover:bg-primary-accent-300 hover:shadow-primary-2 focus:bg-primary-accent-300 focus:shadow-primary-2 focus:outline-none focus:ring-0 active:bg-primary-600 active:shadow-primary-2 motion-reduce:transition-none dark:shadow-black/30 dark:hover:shadow-dark-strong dark:focus:shadow-dark-strong dark:active:shadow-dark-strong"
              data-twe-ripple-init
              data-twe-ripple-color="light">
              Button
            </button>
          </div>
        </div>
        <!-- Card -->
      </div>
      <!-- First column -->

      <!-- Second column -->
      <div>
        <!-- Card -->
        <div
          class="block rounded-lg bg-white shadow-[0_2px_15px_-3px_rgba(0,0,0,0.07),0_10px_20px_-2px_rgba(0,0,0,0.04)] dark:bg-neutral-700">
          <div
            class="relative overflow-hidden bg-cover bg-no-repeat"
            data-twe-ripple-init
            data-twe-ripple-color="light">
            <img
              class="rounded-t-lg"
              src="https://tecdn.b-cdn.net/img/new/standard/nature/186.jpg"
              alt="" />
            <a href="#!">
              <div
                class="absolute bottom-0 left-0 right-0 top-0 h-full w-full overflow-hidden bg-[hsla(0,0%,98%,0.15)] bg-fixed opacity-0 transition duration-300 ease-in-out hover:opacity-100"></div>
            </a>
          </div>
          <div class="p-6">
            <h5
              class="mb-2 text-xl font-medium leading-tight text-neutral-800 dark:text-neutral-50">
              Card title
            </h5>
            <p class="mb-4 text-base text-neutral-600 dark:text-neutral-200">
              Some quick example text to build on the card title and make up the
              bulk of the card's content.
            </p>
            <button
              type="button"
              class="inline-block rounded bg-primary px-6 pb-2 pt-2.5 text-xs font-medium uppercase leading-normal text-white shadow-primary-3 transition duration-150 ease-in-out hover:bg-primary-accent-300 hover:shadow-primary-2 focus:bg-primary-accent-300 focus:shadow-primary-2 focus:outline-none focus:ring-0 active:bg-primary-600 active:shadow-primary-2 motion-reduce:transition-none dark:shadow-black/30 dark:hover:shadow-dark-strong dark:focus:shadow-dark-strong dark:active:shadow-dark-strong"
              data-twe-ripple-init
              data-twe-ripple-color="light">
              Button
            </button>
          </div>
        </div>
        <!-- Card -->
      </div>
      <!-- Second column -->

      <!-- Third column -->
      <div>
        <!-- Card -->
        <div
          class="block rounded-lg bg-white shadow-[0_2px_15px_-3px_rgba(0,0,0,0.07),0_10px_20px_-2px_rgba(0,0,0,0.04)] dark:bg-neutral-700">
          <div
            class="relative overflow-hidden bg-cover bg-no-repeat"
            data-twe-ripple-init
            data-twe-ripple-color="light">
            <img
              class="rounded-t-lg"
              src="https://tecdn.b-cdn.net/img/new/standard/nature/186.jpg"
              alt="" />
            <a href="#!">
              <div
                class="absolute bottom-0 left-0 right-0 top-0 h-full w-full overflow-hidden bg-[hsla(0,0%,98%,0.15)] bg-fixed opacity-0 transition duration-300 ease-in-out hover:opacity-100"></div>
            </a>
          </div>
          <div class="p-6">
            <h5
              class="mb-2 text-xl font-medium leading-tight text-neutral-800 dark:text-neutral-50">
              Card title
            </h5>
            <p class="mb-4 text-base text-neutral-600 dark:text-neutral-200">
              Some quick example text to build on the card title and make up the
              bulk of the card's content.
            </p>
            <button
              type="button"
              class="inline-block rounded bg-primary px-6 pb-2 pt-2.5 text-xs font-medium uppercase leading-normal text-white shadow-primary-3 transition duration-150 ease-in-out hover:bg-primary-accent-300 hover:shadow-primary-2 focus:bg-primary-accent-300 focus:shadow-primary-2 focus:outline-none focus:ring-0 active:bg-primary-600 active:shadow-primary-2 motion-reduce:transition-none dark:shadow-black/30 dark:hover:shadow-dark-strong dark:focus:shadow-dark-strong dark:active:shadow-dark-strong"
              data-twe-ripple-init
              data-twe-ripple-color="light">
              Button
            </button>
          </div>
        </div>
        <!-- Card -->
      </div>
      <!-- Third column -->
    </div>
    <!-- Grid -->
Don't forget to add Ripple to your JavaScript initialization in
your src/js/index.js file:
        // Initialization for ES Users
        import { Carousel, Collapse, Ripple, initTWE } from 'tw-elements';

        initTWE({ Carousel, Collapse, Ripple });
Step 4 - customize the content of the cards
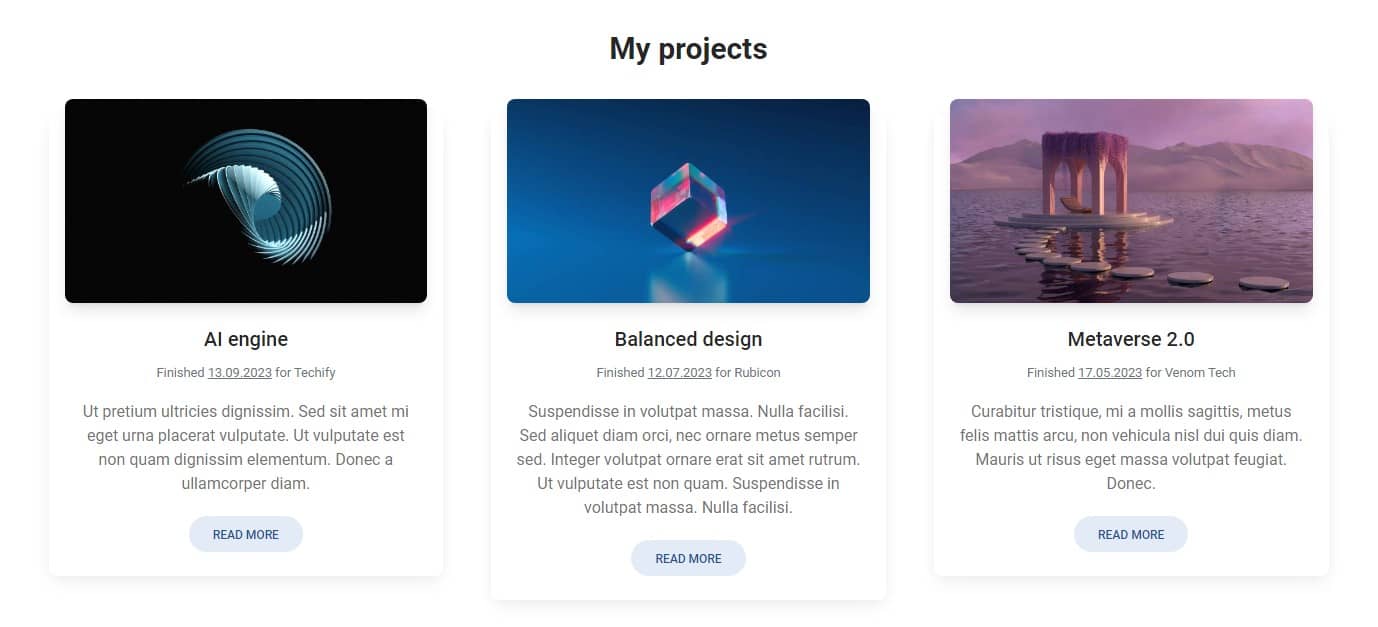
Add texts and graphics to cards according to your preferences. I added the following:
    <!-- Grid -->
    <div class="grid grid-cols-1 gap-8 lg:grid-cols-3 xl:gap-12">
      <!-- First column -->
      <div>
        <!-- Card -->
        <div
          class="block rounded-lg bg-white shadow-[0_2px_15px_-3px_rgba(0,0,0,0.07),0_10px_20px_-2px_rgba(0,0,0,0.04)] dark:bg-neutral-700">
          <div
            class="relative overflow-hidden bg-cover bg-no-repeat"
            data-twe-ripple-init
            data-twe-ripple-color="light">
            <img
              class="w-full rounded-t-lg"
              src="https://mdbootstrap.com/img/new/textures/small/148.jpg"
              alt="" />
            <a href="#!">
              <div
                class="absolute bottom-0 left-0 right-0 top-0 h-full w-full overflow-hidden bg-[hsla(0,0%,98%,0.15)] bg-fixed opacity-0 transition duration-300 ease-in-out hover:opacity-100"></div>
            </a>
          </div>
          <div class="p-6">
            <h5
              class="mb-2 text-xl font-medium leading-tight text-neutral-800 dark:text-neutral-50">
              AI engine
            </h5>
            <p class="mb-4 text-gray-500 dark:text-neutral-400">
              <small
                >Finished <u>13.09.2023</u> for
                <a href="" class="text-dark">Techify</a></small
              >
            </p>
            <p class="mb-5 text-base text-neutral-500 dark:text-neutral-200">
              Ut pretium ultricies dignissim. Sed sit amet mi eget urna placerat
              vulputate. Ut vulputate est non quam dignissim elementum. Donec a
              ullamcorper diam.
            </p>
            <button
              type="button"
              data-twe-ripple-init
              data-twe-ripple-color="primary"
              class="inline-block rounded-full bg-primary-100 px-6 pb-2 pt-2.5 text-xs font-medium uppercase leading-normal text-primary-700 transition duration-150 ease-in-out hover:bg-primary-accent-100 focus:bg-primary-accent-100 focus:outline-none focus:ring-0 active:bg-primary-accent-200">
              Read more
            </button>
          </div>
        </div>
        <!-- Card -->
      </div>
      <!-- First column -->

      <!-- Second column -->
      <div>
        <!-- Card -->
        <div
          class="block rounded-lg bg-white shadow-[0_2px_15px_-3px_rgba(0,0,0,0.07),0_10px_20px_-2px_rgba(0,0,0,0.04)] dark:bg-neutral-700">
          <div
            class="relative overflow-hidden bg-cover bg-no-repeat"
            data-twe-ripple-init
            data-twe-ripple-color="light">
            <img
              class="w-full rounded-t-lg"
              src="https://mdbootstrap.com/img/new/textures/small/38.jpg"
              alt="" />
            <a href="#!">
              <div
                class="absolute bottom-0 left-0 right-0 top-0 h-full w-full overflow-hidden bg-[hsla(0,0%,98%,0.15)] bg-fixed opacity-0 transition duration-300 ease-in-out hover:opacity-100"></div>
            </a>
          </div>
          <div class="p-6">
            <h5
              class="mb-2 text-xl font-medium leading-tight text-neutral-800 dark:text-neutral-50">
              Balanced design
            </h5>
            <p class="mb-4 text-gray-500 dark:text-neutral-400">
              <small
                >Finished <u>12.07.2023</u> for
                <a href="" class="text-dark">Rubicon</a></small
              >
            </p>
            <p class="mb-5 text-base text-neutral-500 dark:text-neutral-200">
              Suspendisse in volutpat massa. Nulla facilisi. Sed aliquet diam
              orci, nec ornare metus semper sed. Integer volutpat ornare erat
              sit amet rutrum. Ut vulputate est non quam. Suspendisse in
              volutpat massa. Nulla facilisi.
            </p>

            <button
              type="button"
              data-twe-ripple-init
              data-twe-ripple-color="primary"
              class="inline-block rounded-full bg-primary-100 px-6 pb-2 pt-2.5 text-xs font-medium uppercase leading-normal text-primary-700 transition duration-150 ease-in-out hover:bg-primary-accent-100 focus:bg-primary-accent-100 focus:outline-none focus:ring-0 active:bg-primary-accent-200">
              Read more
            </button>
          </div>
        </div>
        <!-- Card -->
      </div>
      <!-- Second column -->

      <!-- Third column -->
      <div>
        <!-- Card -->
        <div
          class="block rounded-lg bg-white shadow-[0_2px_15px_-3px_rgba(0,0,0,0.07),0_10px_20px_-2px_rgba(0,0,0,0.04)] dark:bg-neutral-700">
          <div
            class="relative overflow-hidden bg-cover bg-no-repeat"
            data-twe-ripple-init
            data-twe-ripple-color="light">
            <img
              class="w-full rounded-t-lg"
              src="https://mdbootstrap.com/img/new/textures/small/55.jpg"
              alt="" />
            <a href="#!">
              <div
                class="absolute bottom-0 left-0 right-0 top-0 h-full w-full overflow-hidden bg-[hsla(0,0%,98%,0.15)] bg-fixed opacity-0 transition duration-300 ease-in-out hover:opacity-100"></div>
            </a>
          </div>
          <div class="p-6">
            <h5
              class="mb-2 text-xl font-medium leading-tight text-neutral-800 dark:text-neutral-50">
              Metaverse 2.0
            </h5>
            <p class="mb-4 text-gray-500 dark:text-neutral-400">
              <small
                >Finished <u>17.05.2023</u> for
                <a href="" class="text-dark">Venom Tech</a></small
              >
            </p>
            <p class="mb-5 text-base text-neutral-500 dark:text-neutral-200">
              Curabitur tristique, mi a mollis sagittis, metus felis mattis
              arcu, non vehicula nisl dui quis diam. Mauris ut risus eget massa
              volutpat feugiat. Donec.
            </p>

            <button
              type="button"
              data-twe-ripple-init
              data-twe-ripple-color="primary"
              class="inline-block rounded-full bg-primary-100 px-6 pb-2 pt-2.5 text-xs font-medium uppercase leading-normal text-primary-700 transition duration-150 ease-in-out hover:bg-primary-accent-100 focus:bg-primary-accent-100 focus:outline-none focus:ring-0 active:bg-primary-accent-200">
              Read more
            </button>
          </div>
        </div>
        <!-- Card -->
      </div>
      <!-- Third column -->
    </div>
    <!-- Grid -->
Step 5 - add a margin to the image
To create the impression of cascade, we must first add some margins to the image wrapper.
Let's add the .mx-4 class to the
<div> wrapping the image, to add some margin on the
sides.
    <div
      class="relative mx-4 overflow-hidden bg-cover bg-no-repeat"
      data-twe-ripple-init
      data-twe-ripple-color="light">
      <img
        class="rounded-t-lg"
        src="https://mdbootstrap.com/img/new/textures/small/148.jpg"
        alt="" />
      [...]
    </div>

AI engine
Finished 13.09.2023 for Techify
Ut pretium ultricies dignissim. Sed sit amet mi eget urna placerat vulputate. Ut vulputate est non quam dignissim elementum. Donec a ullamcorper diam.
Step 6 - add shadows and roundings
To give the impression of an independent, cascading layer, the image should
have its own shadow and roundings. We can achieve this by changing
.rounded-t-lg class to rounded-lg class in the
<img> element and adding .shadow-lg class to
the wrapper of the image:
    <div
      class="relative mx-4 overflow-hidden bg-cover bg-no-repeat shadow-lg"
      data-twe-ripple-init
      data-twe-ripple-color="light">
      <img
        class="rounded-lg"
        src="https://mdbootstrap.com/img/new/textures/small/148.jpg"
        alt="" />

      [...]
    </div>
AI engine
Finished 13.09.2023 for Techify
Ut pretium ultricies dignissim. Sed sit amet mi eget urna placerat vulputate. Ut vulputate est non quam dignissim elementum. Donec a ullamcorper diam.
Step 7 - add a negative top margin
And now the most important detail - let's add a negative top margin to the image wrapper, to make it overlap the card.
To add a negative margin, we use
normal spacing classes
such as .mr-4 or .mt-5, but add
- before them.
Now let's add .-mt-4 class to the image wrapper:
    <div
      class="relative mx-4 -mt-4 overflow-hidden bg-cover bg-no-repeat shadow-lg"
      data-twe-ripple-init
      data-twe-ripple-color="light">
      <img
        class="rounded-lg"
        src="https://mdbootstrap.com/img/new/textures/small/148.jpg"
        alt="" />

      [...]
    </div>
If you save the file, you will see that the entire class has moved up,
instead of just the image. This is because we need also change the
display property in our card from ..block to
.inline-block
    <!-- Card -->
    <div
      class="inline-block rounded-lg bg-white shadow-[0_2px_15px_-3px_rgba(0,0,0,0.07),0_10px_20px_-2px_rgba(0,0,0,0.04)] dark:bg-neutral-700">
      [...]
    </div>
And now it works 🚀
AI engine
Finished 13.09.2023 for Techify
Ut pretium ultricies dignissim. Sed sit amet mi eget urna placerat vulputate. Ut vulputate est non quam dignissim elementum. Donec a ullamcorper diam.
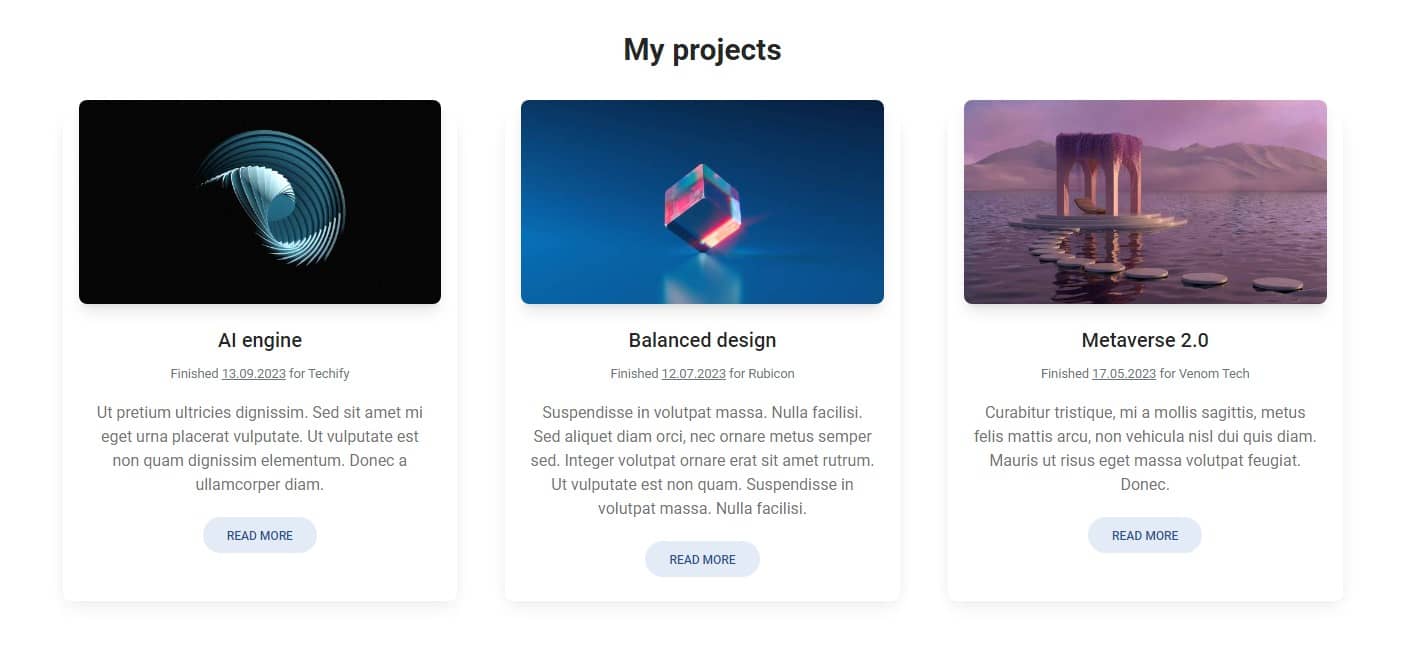
Step 8 - adjust the height of the cards
As you can see, the middle card has a bit more text, making it taller.
It would definitely look better if, regardless of the amount of content, all cards kept the same height.
To achieve this we need to add the ..h-full class to each card.
    <!-- Card -->
    <div
      class="inline-block h-full rounded-lg bg-white shadow-[0_2px_15px_-3px_rgba(0,0,0,0.07),0_10px_20px_-2px_rgba(0,0,0,0.04)] dark:bg-neutral-700">
      [...]
    </div>
And now they are equal:
Step 9 - adjust roundings
In this project, we use strong rounding of the corners. For the sake of
consistency, let's replace the
.rounded-lg classes with .rounded-xl to increase
rounding in cards and images:
    <!-- Card -->
    <div
      class="inline-block h-full rounded-xl bg-white shadow-[0_2px_15px_-3px_rgba(0,0,0,0.07),0_10px_20px_-2px_rgba(0,0,0,0.04)] dark:bg-neutral-700">
      <div
        class="relative mx-4 -mt-4 overflow-hidden bg-cover bg-no-repeat shadow-lg"
        data-twe-ripple-init
        data-twe-ripple-color="light">
        <img
          class="rounded-xl"
          src="https://mdbootstrap.com/img/new/textures/small/148.jpg"
          alt="" />

        [...]
      </div>

      [...]
    </div>
    <!-- Card -->
AI engine
Finished 13.09.2023 for Techify
Ut pretium ultricies dignissim. Sed sit amet mi eget urna placerat vulputate. Ut vulputate est non quam dignissim elementum. Donec a ullamcorper diam.
And that's it. Our cascading cards are ready!

About author
Michal Szymanski
Co Founder at TW Elements and MDBootstrap / Listed in Forbes „30 under 30" / Open-source enthusiast / Dancer, nerd & book lover.
Author of hundreds of articles on programming, business, marketing and productivity. In the past, an educator working with troubled youth in orphanages and correctional facilities.